A Total Amateur's Guide to Ergo Keyboards
Table of Contents
1. Motivation
You're probably here because you work an office job that has you typing a lot, and you can already feel the beginning twinges of pain, numbness, tingling, or a heavy weight in fingers or hands whenever you use your computer, and can feel the sense of impending doom encroaching on you. Or maybe you're smart, and you're looking to prevent it before it happens. That's good! Office workers are prone to occupational injuries just like any other kind of laborer, even if we do tend to be safer than blue collar workers; thus, the mindset that many office workers take, of assuming we are immune from such concerns, or just complaining about the pain but ultimately ignoring it, is silly. Just like our siblings in manual labor, we should take precautions, including buying and learning how to use professional equipment, to help ourselves avoid common and preventable occupational injuries.
Whatever the case, I'm going to assume you've already done all the basics everyone recommends:
- you take breaks every thirty minutes,
- you've made sure the ergonomics of your workspace are good,
- you try to have good posture and typing form, and
- you use a trackball or vertical mouse to eliminate wrist pain from mousing, perhaps even one attached to your keyboard to protect your shoulder from the repeated swininging motion of leaving your keyboard and going back to it,
- learned to efficiently use keyboard shortcuts, software and keyboard macros, and simple scripts to help you avoid repetitive operations (computers are supposed to automate your tasks, not just turn each physical lever you'd have to push into a mouse click instead, but unfortunately most people seem to not realize this! You can type less, without doing less, if you play your cards right!)1
…but none of it seems to have made your pain go away. I'll try to help you with that, because I've been in the same boat… and so have a lot of other people!
This pain is caused by the rapid, repetitive motion of hitting keys and moving the mouse day in, day out, for hours, combined with the various ways in which traditional computer input devices unecessarily strain your tendons, nerves, and muscles in your wrists, hands, elbows, and shoulders. This pain you're feeling has a name: RSI. Although it is also common for farmers, mechanics, assembly line workers, and many others, it is perhaps most prevelant, and most preventable, in office workers. Here's a good definition:
In simple medical terms, repetitive strain injury (RSI) is defined as a cumulative trauma disorder (CTD) stemming from prolonged repetitive, forceful, or awkward hand movements. The result is damage to muscles, tendons, and nerves of the neck, shoulder, forearm, and hand, which can cause pain, weakness, numbness, or impairment of motor control. — A very good, if amateur, guide to Repetitive Strain Injury by Clay Scott
Well, there's bad news and there's good news.
The bad news is that no matter how well you adjust your workstation and pay attention to your posture, the input devices we use every day are fundamentally broken. The row-staggered key positioning and QWERTY letter layout of a traditional keyboard, for instance, was designed around the technical constraints of the 1800s typewriter, as was the unified, linear design that forces your hands right up next to each other with an awkward bend at your wrists. Likewise, the keys on most keyboards are designed to be cheap to produce and maximally thin, not actually good for you. This means that if your issues are really truely bad enough, or you type on a computer enough each day, you will unavoidably run into issues.
Fortunately, there is a way out. As part of a holistic plan including a trackball or vertical mouse, a blue light filter on your screen, taking breaks, exercising and stretching your wrists, and so on, one of the things you can do is choose a fundamentally better input model.
However, because few people actually venture outside of their comfort zone enough to check out such alternative input models — even if it would benefit them immensely — the most radical and effective alternative input models also tend to be the most expensive (the original DataHand, for instance, widely credited by those with RSI who've used it as the best option almost conceivable this side of a brain computer interface, can run you thousands, although its open source DIY successor, the Svalboard, will run you "only" $800 for a kit where you need to 3D print the case yourself), and also the hardest to learn, because they are the most different from what we were trained with and what other people use.
Additionally, everyone's body, workload, and workspace is different, meaning everyone's body will experience different strains and stresses in different places, and thus be benefited by different ergonomic adjustments.
Thus the search for a more ergonomic input model is often not a process of simply selecting the optimum ideal input device, but instead a process of deciding just how ergonomic you want to, and can afford to, go based on how much ergonomics are really worth it to you personally, as well as choosing among a myriad of options depending on what your particular needs are. This guide should hopefully provide some introductory resources that will help you figure out where to look.
2. Disclaimer
I've been programming probably for on average ten hours a day since I was seven, and writing essays and novels since 17. I like to say I dream code and bleed bytes and vomit essays. So I have a lot of experience interfacing with computers. Likewise, I've been slowly gathering practical, real world knowledge about keyboard ergonomics for awhile now, and recently been researching it. However, I still know a lot less than many people you'll find online, and I'm certainly not an expert, so take this guide as just a starting point.
3. Vocabulary
First of all, some vocabulary. I'll also mention various ergonomic tips in the vocabulary items, so I recommend reading them.
3.1. Ergonomics
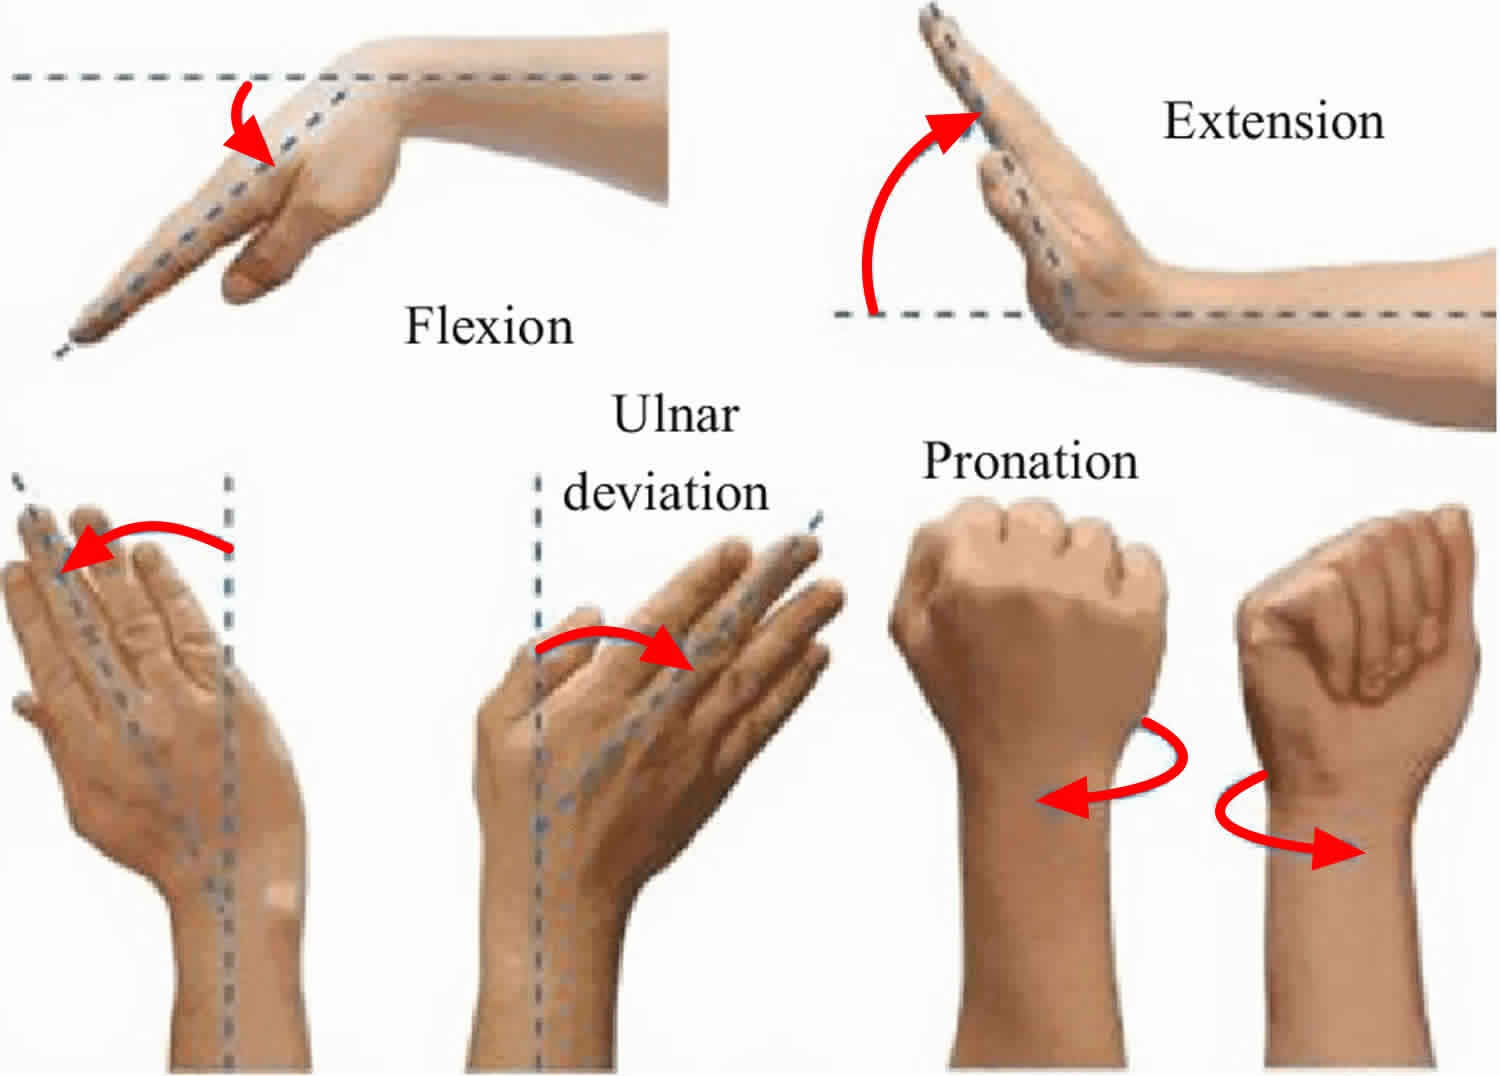
- Flexion: the act of bending your wrist down; this is bad because it compresses the nerves, tendons that pass through the carpal tunnel in your wrist in a tight bundle
- Extension: the act of bending your wrist up; this is bad because it stretches them, as well as the muslces in your forearms, which can be good in short doses, but will cause strain after long periods of time, especially in conjunction with actually trying to use your fingers while your wrists are in that position
- Ulnar deviation: the act of bending your wrist out from the center; this one is the really painful one, because it both strains and compresses the nerves and tendons in your wrists
- Pronation: the act of having your wrist twisted so your palm faces all the way down, or all the way up; this one is bad because it crosses the bones in your forearms, which can pinch things and even cause scar tissue!
3.2. Ergonomic Keyboards
Split layout: a keyboard with a split layout is one where the main key cluster has been divided in half, although the keyboard itself still remains one piece. These halves are typically angled out from each other, to reduce ulnar deviation.
https://img-prod-cms-rt-microsoft-com.akamaized.net/cms/api/am/imageFileData/REMxY2?ver=a207
Fully split: a fully split keyboard is one where not only is the main key cluster divided in half, but the whole keyboard is along with it. This allows you to adjust both the angle of the halves, allowing you to more precisely eliminate ulnar deviation, and spread the halves shoulder-width or more apart, correcting posture

Tenting: when the halves of a split or split layout keyboard are rotated up, sort of resembling a stereotypical trianglar tent, in an effort to reduce wrist pronation
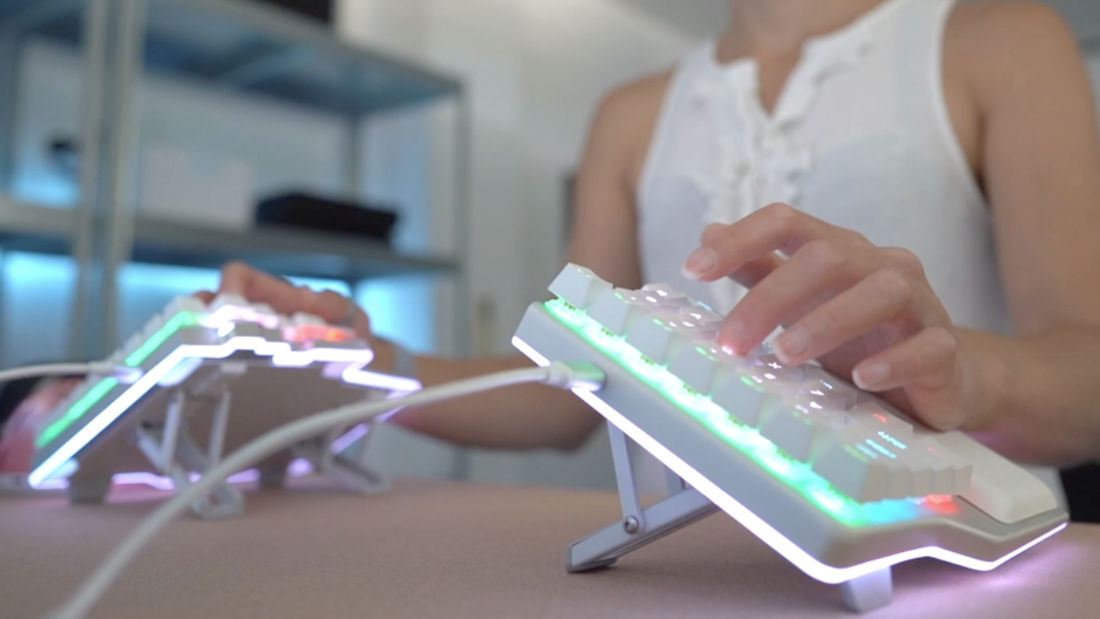
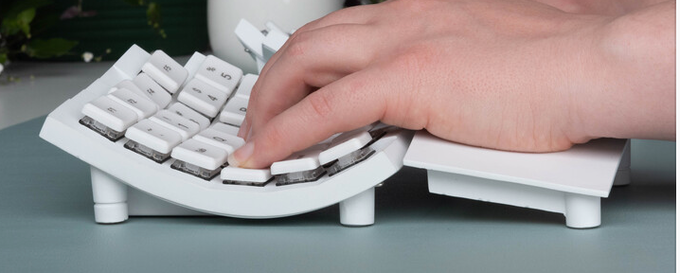
Key wells: putting the keys in a semispherical depression. This tries to ensure that each row of your keyboard is equadistant from your fingers, at least roughly speaking, so that you have to stretch less, and also so that the keyboard conforms to the natural range of motion of your swinging fingers.
x% keyboard: the standard keyboard, as popularized by IBM, has 104 keys. Thus, keyboards with fewer keys are typically characterized in percentages relative to that. For instance, a keyboard with roughly 60 keys, from 54-58, will be called a 60% keyboard. One with 80-86 keys will be called an 80%, or "tenkeyless" because the keys it is missing will typically be the numeric keypad.

ortholinear keyboards: ortholinear keyboards are keyboards where the keys, instead of being staggered, are instead laid out in a linear matrix grid. This makes some sort of sense for split and split layout keyboards, where the linear columns can be oriented in the same direction as your hands, so that your fingers move up and down the key columns more naturally, eliminating a lot of the diagonal motions your fingers are forced to make when touch typing on a regular keyboard, however on non split keyboards imo they're far worse, since to get your fingers to match up with the columns, you'd have to put your hands right next to each other and straight up and down, absolutly fucking maximizing your ulnar deviation
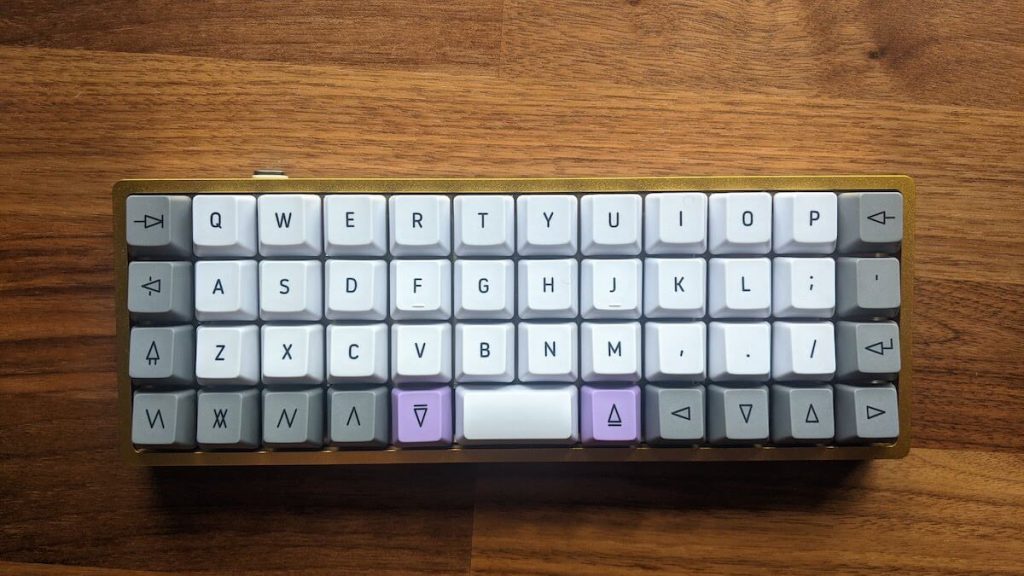
column-stagger keyboards: these are like ortholinear, except the columns are offset (instead of the rows like on a normal keyboard) to take into account the length of each finger.
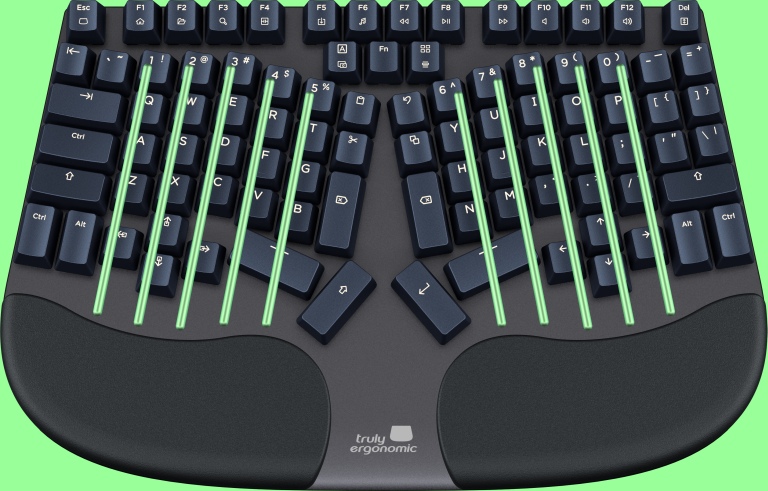
splayed columns: some ortholinear or column stagger keyboards actually splay, or rotate, the columns for each finger out. This is because your fingers don't just hinge straight up and down from your palm, they splay out, at least when making a comfortable and natural motion. Splayed keyboards take this into account.

thumb cluster: our thumbs are our strongest, most resiliant fingers, and also quite dextrous — for instance, I can type at 60wpm with just two thumbs on my phone keyboard! Meanwhile, our pinkies are our weakest, shortest, and least dextrous and resiliant fingers. So why are such important keys as backspace and shift, and keys we will be holding down while pressing other keys, such as control and alt, on our pinkies?! Especially since oftentimes, pressing keys on the edges of our keyboards with our pinkies leads to ulnar deviation! Many more expensive ergo keyboards move a lot of the keys usually left to our pinkies, on the edges of the keyboard, to our thumbs, by breaking up the spacebar.

3.3. Mechanical Key Switches
- Key switches and caps: the keys in your keyboard are made up of two parts: the switch, and the cap. A key switch is responsible for providing the resistence of the key to being pressed, the tactile experience of pressing it, and returning the key to its unpressed state automatically after you press it. The cap is the actual plastic thing that you touch and see, usually printed with the key's legend, which is attached to the key switch's stem, the vertical post/plunger that goes through the key switch and out of it as a mounting point for the cap.
- Travel/throw: the distance a key can be pressed before it stops ("bottoms out")
- Actuation point: the point in the travel of a key at which the computer/keyboard actually registers that the key has been pressed
- Rubber dome & scissor key switches: most keyboards in the world use so-called "rubber dome" keys: underneath the face plate and key caps, there is a single sheet of silicone or rubber with little domes molded onto it for each key. Pressing down on a key meets some resistence from the rubber dome, until you apply enough force to collapse the dome, at which point it will invert, touching a small metal plate inside it to the metal plate below it and registering the key. Some keyboards, like good quality laptop keyboards or Apple's keyboards, are called "scissor switch" keyboards: these are still rubber dome (also called "membrane") keyboards, but they add an X shaped exoskeleton (think of how the legs of a folding chair work, sort of) to add some stability. The problem with these key switches is that they tend to wear out over time, relatively rapidly for technology, thus needing to be replaced. More relevantly, because of how they work, rubber dome and scissor switch designs only register a keystroke when the key is mashed all the way to the bottom of the key's travel! This means that to type on normal keys, you have to slam the tips of your fingers into a plastic or metal backplate every time. You can try to do it more lightly, but you'll always be forced to go all the way and experience that impact. This can cause damage to your fingers and nerve pain over time (speaking from experience here!)
- Mechanical key switches: mechanical key switches, on the other hand, have a full mechanical mechanism for each key to provide the tactile experience, functionality, and key detection of each key. These mechanisms tend to have a much longer functional lifespan than typical rubber domes, usually in the 50-100 million strokes, and usually actuate in the middle of the key's travel, and provide some kind of detectible tactile feedback when that actuation happens, meaning that you can train yourself to never bottom out your keys, while still accurately and reliably having the keys you type be registered, thus saving finger pain. Furthermore, these mechanical keyboards tend to have a spring in them that provides more constant resistance throughout the switch's travel that increases the further toward bottoming out you go, thanks to how springs work, meaning there's a natural way to cushion or even discourage bottoming out at all! Moreover spring weight and tactile feedback can be highly customized! These mechanical switch mechanisms tend to be composed of several pieces, including:
- Key stem: a pole or plunger that has the key cap attached (typically removably, but not always) on one end, and then the key slider on the other, which goes into the external housing of the key mechanism. Pressing down the key cap presses the stem downward, which drives the mechanism. The shape of the stem effects what key caps you can use.
- Key slider: a small plastic piece slid onto the key stem, which can move up and down on the stem semi-freely, stopped on one end by a hat on the key stem and on the other by the back of the key; by default, in its resting state and prior to the actuation point, the slider separates the contact leaves; however, when pushed down by the stem's hat (the stem in turn pushed down by your finger), the slider eventuallys lides down enough to jump out from between the contact leaves and allow them to touch, thus allowing the key to register as having been pressed. The tactile feel of a key switch is determined by its slider, stem, and leaves.
- Key spring: a spring that braces on one end against the slider, and on the other against the bottom of the key housing, and wraps around the stem itself, providing resistence to the keystroke and springing the key back into place after it is pressed. This effects the effort needed to press the key further down throughout its travel usually expressed as a graph between momentary force exerted (in grams) by the spring against your finger on the vertical axis and distance you've pressed the key cap down on the horizontal axis.
- Contact leaves: metal contacts inside a key switch that, when touching, register a keystroke for the keyboard.
- low-profile/choc switches: these are mechanical key switches with usually around 1/4 to 1/3 of the key travel of a traditional mechanical switch (1.3-2mm instead of 3-4mm)
- switch weight: how many grams of force a key takes to activate. Best understood, as mentioned above, by a graph. Most manufacturers post force graphs of the resistence of their keys, but websites like RTINGS also post their own graphs from empirical testing, which is amazingly useful for judging what the tactile experience of a key switch will be like. Generally, you want the heighest possible weight near the bottom of your switch to prevent you from bottoming out, and the lightest prior to activation, to avoid strain in pressing keys.
- clicky switches: one type of mechanical switch design, designed to feel like, essentially, clicking the a pen in and out at the activation point. Very loud, generally considered to be gouche. The base form of these are usually referred to as "blues," "greens" or sometimes "whites."
- tactile switches: the tactile feel of the activation point on these switches (which, to reiterate, is halfway through their travel) tends to feel like rubber domes or scissors if they were actually good. As you approach activation, force gradually builds up to a peak, then sort of "breaks" and goes back down, at the nadir of which arch the key activates. After that the resistence goes up linearly. Known as "browns", "golds", "clears", or "grays."
- linear switches: these switches have almost no tactile feedback when they register, although they still do register halfway through their throw: instead, the switches just linearly gain in resistence as you go down, and past the activation point the slope of that increase itself goes up a bit. Known as "reds", "blacks", "whites."
- progressive/complex switches: since all key switches use springs under the hood, the base force curve of most switches is linear, with a tactile or clicky bump laid on top of the force curve. Progressive and complex switches, on the other hand, have non-linear force curves: progressive switches have parabolic curves, and complex ones have a parabolic curve that breaks after activation into a linear increase at a steep slope. This allows keys to be very easy to activate, but disproportionately hard to bottom out, to decrease the strain of pressing keys. Real progressive switches can only be bought from SPRiT and then you can mod them into your existing switches. Some tactile switches, most especially the Cherry MX Clears, can give the feeling of being progressive, but they aren't really. The MX Clears make good ergo switches, though. MX Ergo Clears, confusingly, do not.
Here's a GIF of how a common mechanical key switch works:

Alright, with that out of the way, we can continue!
4. Picking An Ergonomic Keyboard
What kind of ergonomic keyboard is right for you depends on your workflow, and what kind of pain you're feeling. The best way to choose one is to just look at the various kinds of ergonomic keyboards, think about the pain you're feeling, and see which one you imagine will give you the most relief! I'll give some guidelines here, though:
If you are dealing with pain from ulnar deviation, you probably want a split keyboard, whether fully or just split-layout:
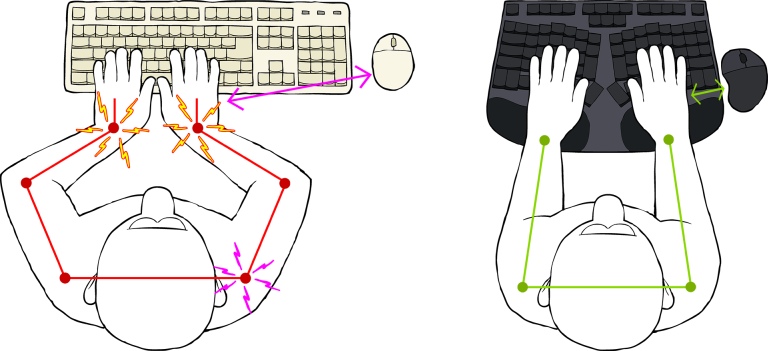
(This is a rather stupid picture, in that it doesn't really make physical sense, but this should give you an idea)
- If you are dealing with pain from wrist pronation, you probably want a tented keyboard
- If you are dealing with right shoulder pain, you probably want a 60 or 80% keyboard, so that you have to move your shoulder less to switch from your keyboard to your mouse
- If you are dealing with pain in your back, neck, both shoulders, or posture issues, you probably want a fully split keyboard
- If you are dealing with wrist extension pain, you want a low-profile, or choc keyboard, although this will cut down your key travel considerably, which may cause issues, so you could alternatively use a wrist rest, although you'll need to make sure that it is the base of your palms, NOT your actual wrists, that rest on it. This will prevent extension by forcing your wrists to stay straight, causing your forearms to bend up to reach the keyboard instead, which is healthier
- If you are dealing with generalized wrist pain or finger pain not in your finger tips, you probably want to look into an ortholinear or especially column-staggered split or split layout keyboard. Also look into splayed keyboards, although they are rare
- If you are experiencing pain in the tips of your fingers that shoots up through your hand, from the impact of bottoming out your keys, look into a full-travel mechanical keyboard
- If you are experiencing pain from straining your fingers too much, look into a low-force choc mechanical keyboard
Note that most of these are separate features, where you can have basically any combination you like, so think of the above as a menu to pick from, to figure out in your mind's eye what your ideal keyboard would look like. The only factor that isn't really independent from the others is that most really good quality ergonomic keyboards will have some kind of mechanical key switch, since they are generally agreed upon to be more ergonomic and because ergo keyboards are generally for enthusiasts, who care about the experience of using their keyboards, and so will want a more pleasurable tactile experience from their keys, as well as because ergo keyboards tend to be more expensive and highly personal, so you want the keys to last longer.
At this juncture, you should be able to search (I recommend using DuckDuckGo instead of Google for this: for the past year or so it has consistently given far better, and less ad-infested, results) up the sort of keyboard you want, but I'll give some examples as well.
4.1. Proletarian Options (~$30-100)
If you want the cheapest possible option that will give you a split layout and some tenting — and in the case of the latter a very basic thumb cluster of backspace in addition to space — but nothing else, and don't care about mechanical key switches, look for one of the Microsoft Natural Keyboards or 2013 Microsoft Sculpt Keyboard on eBay.
If you want a want a fully split keyboard with amazing tenting options, and still don't care about mechanical keys, go with something like the Kinesis Freestyle2. There are also cheaper similar keyboards that don't support tenting as well that you can buy on Amazon, but Kinesis is a very well respected, good brand, and at $55 for a refurbished unit their Freestyle2 is pretty affordable, so I'd recommend springing for the investment.
Things get a bit more complicated with mechanical keyboards.
If you want a split layout keyboard with a good thumb cluster and mechanical key switches, plus column-staggered and splayed rows, but no tenting, look at the X-Bows line. This is what I've settled on: it isn't the theoretical best, but the Lite model is relatively cheap, they're easy to adapt to, and give the best ergnomic bang for your buck for a mechanical keyboard.
If you just want a split layout, but don't care about column stagger or splay, or thumb clusters, you can get an "Alice" layout keyboard, although they aren't usually even considered ergonomic, because of how few benefits you get from them. Here's an example of a relatively cheap one from a good brand: Keychron V10 (Alice Layout).
If you want some amount of tenting to go with your split layout, but don't care so much about the key layout itself still, look at the Neo Ergo, realize at this point it'd be far cheaper to get something better, and move on.
4.2. Petite Bourgouise Options (~$100-$250)
Now comes the fun part. What if you want a thumb cluster, to alleviate your pinkies, mechanical key switches, to help your fingers and keep your keyboard for longer, a split layout, or fully split design, to help your wrists, column-staggered keys, and tenting options or some built in tenting. Now what do you do? Well, there are options.
One is to buy a Kinesis Advantage used off eBay: these have full thumb clusters, column staggered and splayed keys, some mild tenting built in, a split design, mechanical keys, and key wells, which are absolutely amazing, ensuring that each row of keys is equadistant from your fingers and in line with your fingers' natural arc of motion! These will be expensive though, running you anywhere from $130-$260 on eBay. Also, the style of split layout design they have is awkward: instead of having each half split out at a certain angle, so that you can ensure your wrists come in at that angle from whatever width your shoulders are by just moving your keyboard backward or forward, they try instead to make the keyboard so wide that each half is in line with your shoulders. This only works if you happen to have averate-to-small shoulders. Also, thanks to the key wells, the device is quite tall, so if your desk, like mine, isn't adjustable, this may not work for you.
After the Kenesis, in this price bracket, you only have one choice: DIY. This will likely run you a lot, although it'll vary wildy depending on which kit you choose and what options. If you're not a programmer so you don't need a lot of keys for symbols, I recommend checking out the Keebio Iris Rev 8 or its choc sister. Just choose the plates, middle layer, switches, and keycaps you want, and order. Should run you roughly $186 if you just get the provided key switches and key caps, instead of sourcing your own, and choose all the cheapest case and middle layer options, but can run you around $280 if you're more quality-focused and opinionated and so source your own caps and switches, and up to $460 if you want a proper aluminum case like non-DIY keyboards get. Once you get the kit in the mail, you just snap it together like legos — no soldering or 3d printing needed.
4.3. Bourgouise Options ($250-♾️)
Kinesis 360, Glove80, Svalboard, Dactyl Manuform. They have it all.
Footnotes:
For instance, learning Vim keybindings for heavy-duty text editing like writing and programming (Vim is NOT just for programmers!) was the literal best thing I ever did for my carpal tunnel and tendonitis, even over and above getting the ergonomics of my workspace and input devices right!! The second best move I ever made was moving to using software that can be operated entirely by vim like key arpeggios (sequences if keys pressed one after another with an infinite amount of time to press them), instead of key chords (traditional key bindings where you have to hold down one or more keys and then tap a final key).